先考虑用户应该如何使用 1、 服务端 服务端定义一个服务接口
1 2 3 4 5 6 7 8 9 10 11 12 13 14 15 public interface HelloService String hello (String name) ; }
实现服务接口:
1 2 3 4 5 6 7 8 9 10 11 12 13 @RpcService(serviceInterface = HelloService.class, serviceVersion = "1.0.0") public class HelloServiceImpl implements HelloService Override public String hello (String name) { return "hello" + name; } }
在服务端启动的时候会向注册中心注册这个服务。
2、 消费端 1 2 3 4 5 6 7 8 9 10 11 12 @RestController public class HelloController @RpcReference(serviceVersion = "1.0.0", timeout = 3000) private HelloFacade helloFacade; @RequestMapping(value = "/hello", method = RequestMethod.GET) public String sayHello () return helloFacade.hello("mini rpc" ); } }
服务提供者提供服务 1、RPC服务端 服务提供者采用的是主从 Reactor 线程模型,启动过程包括配置线程池、Channel 初始化、端口绑定三个步骤
1 2 3 4 5 6 7 8 9 10 11 12 13 14 15 16 17 18 19 20 21 22 23 24 25 26 27 28 29 30 31 32 33 34 35 36 37 38 39 40 41 42 43 44 45 46 47 48 49 50 51 52 53 54 55 56 57 58 59 60 61 62 63 64 65 66 67 package com.castile.rpc.provider;import com.castile.rpc.provider.autoconfig.RpcProperties;import io.netty.bootstrap.ServerBootstrap;import io.netty.channel.ChannelFuture;import io.netty.channel.ChannelInitializer;import io.netty.channel.ChannelOption;import io.netty.channel.nio.NioEventLoopGroup;import io.netty.channel.socket.SocketChannel;import io.netty.channel.socket.nio.NioServerSocketChannel;import io.netty.handler.logging.LoggingHandler;import lombok.extern.slf4j.Slf4j;import org.springframework.boot.ApplicationArguments;import org.springframework.boot.ApplicationRunner;import org.springframework.stereotype.Component;import javax.annotation.Resource;import java.net.InetAddress;@Component @Slf4j public class RpcServerRunner implements ApplicationRunner @Resource private RpcProperties properties; public void run (ApplicationArguments args) throws Exception String address = InetAddress.getLocalHost().getHostAddress(); NioEventLoopGroup boss = new NioEventLoopGroup(); NioEventLoopGroup worker = new NioEventLoopGroup(); try { ServerBootstrap serverBootstrap = new ServerBootstrap().group(boss, worker) .channel(NioServerSocketChannel.class) .childHandler(new ChannelInitializer<SocketChannel>() { @Override protected void initChannel (SocketChannel socketChannel) throws Exception socketChannel.pipeline().addLast(new LoggingHandler()); } }) .option(ChannelOption.SO_KEEPALIVE, true ); ChannelFuture channelFuture = serverBootstrap.bind(address, this .properties.getPort()).sync(); log.info("连接信息:server addr {} started on port {}" , address, this .properties.getPort()); channelFuture.channel().closeFuture().sync(); } catch (Exception e) { boss.shutdownGracefully(); worker.shutdownGracefully(); } } }
2、发布服务 定义一个注解,用于标识一个服务
1
2
3
4
5
6
7
8
9
10
11
12
13
14
15
16
17
18
19
20
21
22
23
24
25
26
27
28
29
30
31
32
33
34
package com.castile.rpc.provider; import org.springframework.stereotype.Component; import java.lang.annotation.ElementType; import java.lang.annotation.Retention; import java.lang.annotation.RetentionPolicy; import java.lang.annotation.Target; /** * rpc服务注解 * * @author Hongliang Zhu * @create 2023-09-03 15:51 */ @Retention(RetentionPolicy.RUNTIME) @Target(ElementType.TYPE) @Component public @interface RpcService { /** * 服务所在的接口 * * @return 服务接口 */ Class<?> serviceInterface() default Object.class; /** * 服务版本 * * @return 版本 */ String version() default "1.0.0"; }
有两个重要的属性,serviceInterface表示服务类型接口,version表示服务版本。 服务消费者必须指定完全一样的属性才能正确调用。有了 @RpcService 注解之后,我们就可以在服务实现类上使用它。
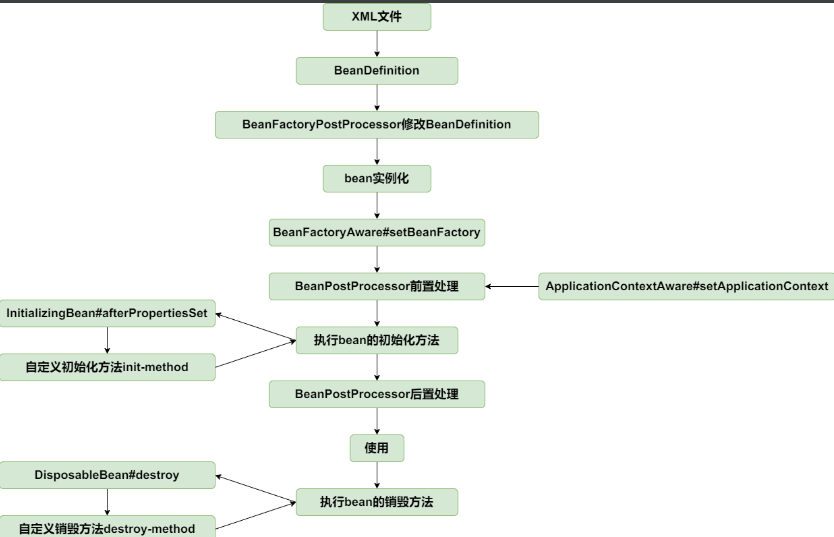
@RpcService 注解本质上就是 @Component,可以将服务实现类注册成 Spring 容器所管理的 Bean。这里需要了解Spring中Bean的生命周期了。
Spring的BeanPostProcessor接口提供了对Bean进行再加工的扩展点。 BeanPostProcessor 常用于处理自定义注解。自定义的 Bean 可以通过实现 BeanPostProcessor 接口,在 Bean 实例化的前后加入自定义的逻辑处理。如下所示,我们通过 RpcProvider 实现 BeanPostProcessor 接口,来实现对 声明 @RpcService 注解服务的自定义处理。
1
2
3
4
5
6
7
8
9
10
11
12
13
14
15
16
17
18
19
20
21
22
23
24
25
26
27
28
29
30
31
32
33
34
35
36
37
38
39
40
41
42
43
44
45
46
47
48
49
50
51
52
53
54
55
56
package com.castile.rpc.provider;import com.castile.rpc.provider.autoconfig.RpcProperties;import lombok.extern.slf4j.Slf4j;import org.springframework.beans.BeansException;import org.springframework.beans.factory.config.BeanPostProcessor;import org.springframework.stereotype.Component;import javax.annotation.Resource;import java.net.InetAddress;import java.net.UnknownHostException;import java.util.HashMap;import java.util.Map;@Slf4j @Component public class RpcProviderProcessor implements BeanPostProcessor private final Map<String, Object> rpcServices = new HashMap<String, Object>(); @Resource private RpcProperties properties; public Object postProcessAfterInitialization (Object bean, String beanName) throws BeansException RpcService rpcService = bean.getClass().getAnnotation(RpcService.class); if (rpcService != null ) { String serviceName = rpcService.serviceInterface().getName(); String serviceVersion = rpcService.version(); try { String address = InetAddress.getLocalHost().getHostAddress(); ServiceMetaData serviceMetaData = new ServiceMetaData(); serviceMetaData.setPort(properties.getPort()); serviceMetaData.setServiceAddr(address); serviceMetaData.setServiceName(serviceName); serviceMetaData.setServiceVersion(serviceVersion); rpcServices.put(serviceName + "#" + serviceVersion, bean); } catch (UnknownHostException e) { log.error("failed to register service {}#{}" , serviceName, serviceVersion, e); } } return bean; } }
服务消费者订阅服务 消费者不属于常驻服务, 每次发起 RPC 调用时它才会去选择向哪个远端服务发送数据。 对于声明 @RpcReference 注解的成员变量,我们需要构造出一个可以真正进行 RPC 调用的 Bean,然后将它注册到 Spring 的容器中。
@RpcReference 注解的定义 :
1
2
3
4
5
6
7
8
9
10
11
12
13
14
15
16
17
18
19
20
@Retention(RetentionPolicy.RUNTIME) @Target(ElementType.TYPE) public @interface RpcReference { String serviceVersion () default "1.0.0" ; long timeout () default 3000 }
需要为使用了@RpcReference注解的成员变量构造成一个自定义的bean对象,并且对该bean对象执行的所有方法进行拦截。
Spring 的 FactoryBean 接口可以帮助我们实现自定义的 Bean,FactoryBean 是一种特种的工厂 Bean,通过 getObject() 方法返回对象,而并不是 FactoryBean 本身。
有了 @RpcReference 注解和 RpcReferenceBean 之后,我们可以使用 Spring 的扩展点 BeanFactoryPostProcessor 对 Bean 的定义进行修改。上文中服务提供者使用的是 BeanPostProcessor,BeanFactoryPostProcessor 和 BeanPostProcessor 都是 Spring 的核心扩展点,它们之间有什么区别呢?BeanFactoryPostProcessor 是 Spring 容器加载 Bean 的定义之后以及 Bean 实例化之前执行,所以 BeanFactoryPostProcessor 可以在 Bean 实例化之前获取 Bean 的配置元数据,并允许用户对其修改。而 BeanPostProcessor 是在 Bean 初始化前后执行,它并不能修改 Bean 的配置信息。
1
2
3
4
5
6
7
8
9
10
11
12
13
14
15
16
17
18
19
20
21
22
23
24
25
26
27
28
29
30
31
32
33
34
35
36
37
38
39
40
41
42
43
44
45
46
47
48
49
50
51
52
53
54
55
56
57
58
59
60
61
62
63
64
65
@Slf4j @Component public class RpcConsumerPostProcessor implements ApplicationContextAware , BeanClassLoaderAware , BeanFactoryPostProcessor public static final String INIT_METHOD_NAME = "init" ; private final Map<String, BeanDefinition> rpcRefBeanDefinitions = new LinkedHashMap<>(); private ApplicationContext context; private ClassLoader classLoader; @Override public void setBeanClassLoader (ClassLoader classLoader) this .classLoader = classLoader; } @Override public void postProcessBeanFactory (ConfigurableListableBeanFactory configurableListableBeanFactory) throws BeansException String[] beanDefinitionNames = configurableListableBeanFactory.getBeanDefinitionNames(); for (String beanDefName : beanDefinitionNames) { BeanDefinition beanDefinition = configurableListableBeanFactory.getBeanDefinition(beanDefName); final String beanClassName = beanDefinition.getBeanClassName(); if (beanClassName != null ) { Class<?> clazz = ClassUtils.resolveClassName(beanClassName, this .classLoader); ReflectionUtils.doWithFields(clazz, this ::parseRpcReference); } } BeanDefinitionRegistry registry = (BeanDefinitionRegistry) configurableListableBeanFactory; this .rpcRefBeanDefinitions.forEach((beanName, definition) -> { if (context.containsBean(beanName)) { throw new IllegalArgumentException("application context already has a bean named " + beanName); } else { registry.registerBeanDefinition(beanName, rpcRefBeanDefinitions.get(beanName)); log.info("registered RpcReferenceBean {} success." , beanName); } }); } @Override public void setApplicationContext (ApplicationContext applicationContext) throws BeansException this .context = applicationContext; } private void parseRpcReference (Field field) RpcReference annotation = AnnotationUtils.getAnnotation(field, RpcReference.class); if (annotation != null ) { BeanDefinitionBuilder builder = BeanDefinitionBuilder.genericBeanDefinition(RpcReferenceBean.class); builder.setInitMethodName(INIT_METHOD_NAME); builder.addPropertyValue("interfaceClass" , field.getType()); builder.addPropertyValue("serviceVersion" , annotation.serviceVersion()); builder.addPropertyValue("timeout" , annotation.timeout()); AbstractBeanDefinition definition = builder.getBeanDefinition(); rpcRefBeanDefinitions.put(field.getName(), definition); } } }