一. NIO 基础 non-blocking io 非阻塞 IO
1. 三大组件 1.1 Channel & Buffer channel 有一点类似于 stream,它就是读写数据的双向通道 ,可以从 channel 将数据读入 buffer,也可以将 buffer 的数据写入 channel,而之前的 stream 要么是输入,要么是输出,channel 比 stream 更为底层
1
2
3
graph LR channel --> buffer buffer --> channel
常见的 Channel 有
FileChannel :文件数据传输通道 DatagramChannel :UDP数据 SocketChannel :TCP数据 ServerSocketChannel buffer 则用来缓冲读写数据,常见的 buffer 有
ByteBufferMappedByteBuffer DirectByteBuffer HeapByteBuffer ShortBuffer IntBuffer LongBuffer FloatBuffer DoubleBuffer CharBuffer 1.2 Selector selector 单从字面意思不好理解,需要结合服务器的设计演化来理解它的用途
多线程版设计 1 2 3 4 5 6 graph TD subgraph 多线程版 t1(thread) --> s1(socket1) t2(thread) --> s2(socket2) t3(thread) --> s3(socket3) end
⚠️ 多线程版缺点 内存占用高 线程上下文切换成本高 只适合连接数少的场景 线程池版设计 1 2 3 4 5 6 7 graph TD subgraph 线程池版 t4(thread) --> s4(socket1) t5(thread) --> s5(socket2) t4(thread) -.-> s6(socket3) t5(thread) -.-> s7(socket4) end
⚠️ 线程池版缺点 阻塞模式下,线程仅能处理一个 socket 连接 仅适合短连接场景 selector 版设计 selector 的作用就是配合一个线程来管理多个 channel,获取这些 channel 上发生的事件,这些 channel 工作在非阻塞模式下,不会让线程吊死在一个 channel 上。适合连接数特别多,但流量低的场景(low traffic)
1 2 3 4 5 6 7 graph TD subgraph selector 版 thread --> selector selector --> c1(channel) selector --> c2(channel) selector --> c3(channel) end
调用 selector 的 select() 会阻塞直到 channel 发生了读写就绪事件,这些事件发生,select 方法就会返回这些事件交给 thread 来处理
2. ByteBuffer 有一普通文本文件 data.txt,内容为
使用 FileChannel 来读取文件内容
1 2 3 4 5 6 7 8 9 10 11 12 13 14 15 16 17 18 19 20 21 22 23 24 25 26 @Slf4j public class ChannelDemo1 public static void main (String[] args) try (RandomAccessFile file = new RandomAccessFile("helloword/data.txt" , "rw" )) { FileChannel channel = file.getChannel(); ByteBuffer buffer = ByteBuffer.allocate(10 ); do { int len = channel.read(buffer); log.debug("读到字节数:{}" , len); if (len == -1 ) { break ; } buffer.flip(); while (buffer.hasRemaining()) { log.debug("{}" , (char )buffer.get()); } buffer.clear(); } while (true ); } catch (IOException e) { e.printStackTrace(); } } }
输出
1 2 3 4 5 6 7 8 9 10 11 12 13 14 15 16 17 10:39:03 [DEBUG] [main] c.i.n.ChannelDemo1 - 读到字节数:10 10:39:03 [DEBUG] [main] c.i.n.ChannelDemo1 - 1 10:39:03 [DEBUG] [main] c.i.n.ChannelDemo1 - 2 10:39:03 [DEBUG] [main] c.i.n.ChannelDemo1 - 3 10:39:03 [DEBUG] [main] c.i.n.ChannelDemo1 - 4 10:39:03 [DEBUG] [main] c.i.n.ChannelDemo1 - 5 10:39:03 [DEBUG] [main] c.i.n.ChannelDemo1 - 6 10:39:03 [DEBUG] [main] c.i.n.ChannelDemo1 - 7 10:39:03 [DEBUG] [main] c.i.n.ChannelDemo1 - 8 10:39:03 [DEBUG] [main] c.i.n.ChannelDemo1 - 9 10:39:03 [DEBUG] [main] c.i.n.ChannelDemo1 - 0 10:39:03 [DEBUG] [main] c.i.n.ChannelDemo1 - 读到字节数:4 10:39:03 [DEBUG] [main] c.i.n.ChannelDemo1 - a 10:39:03 [DEBUG] [main] c.i.n.ChannelDemo1 - b 10:39:03 [DEBUG] [main] c.i.n.ChannelDemo1 - c 10:39:03 [DEBUG] [main] c.i.n.ChannelDemo1 - d 10:39:03 [DEBUG] [main] c.i.n.ChannelDemo1 - 读到字节数:-1
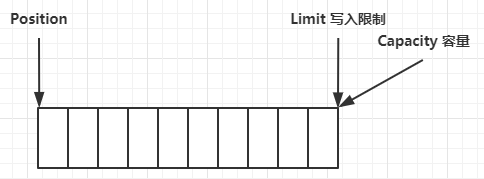
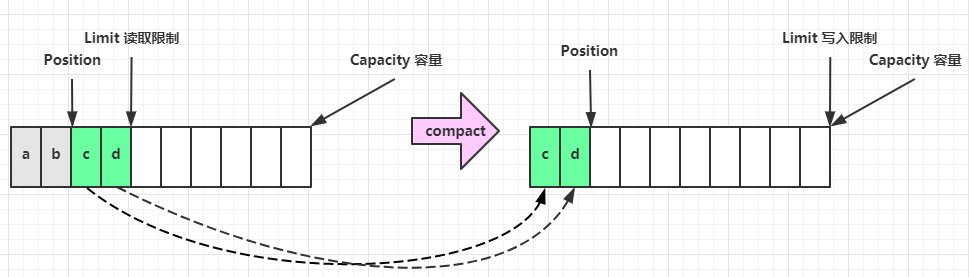
2.1 ByteBuffer 正确使用姿势 向 buffer 写入数据,例如调用 channel.read(buffer) 调用 flip() 切换至读模式 从 buffer 读取数据,例如调用 buffer.get() 调用 clear() 或 compact() 切换至写模式 重复 1~4 步骤 2.2 ByteBuffer 结构 ByteBuffer 有以下重要属性
一开始
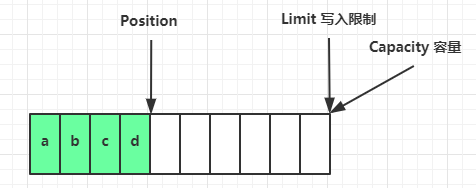
写模式下,position 是写入位置,limit 等于容量,下图表示写入了 4 个字节后的状态
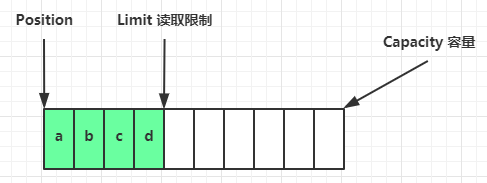
flip 动作发生后,position 切换为读取位置,limit 切换为读取限制
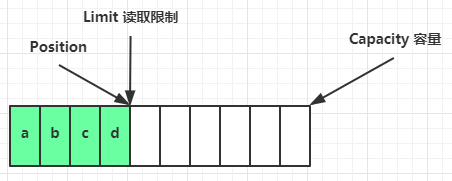
读取 4 个字节后,状态
clear 动作发生后,状态
compact 方法,是把未读完的部分向前压缩,然后切换至写模式
💡 调试工具类 1 2 3 4 5 6 7 8 9 10 11 12 13 14 15 16 17 18 19 20 21 22 23 24 25 26 27 28 29 30 31 32 33 34 35 36 37 38 39 40 41 42 43 44 45 46 47 48 49 50 51 52 53 54 55 56 57 58 59 60 61 62 63 64 65 66 67 68 69 70 71 72 73 74 75 76 77 78 79 80 81 82 83 84 85 86 87 88 89 90 91 92 93 94 95 96 97 98 99 100 101 102 103 104 105 106 107 108 109 110 111 112 113 114 115 116 117 118 119 120 121 122 123 124 125 126 127 128 129 130 131 132 133 134 135 136 137 138 139 140 141 142 143 144 145 146 147 148 149 150 151 152 153 154 155 156 157 158 159 160 161 162 163 164 165 166 167 168 public class ByteBufferUtil private static final char [] BYTE2CHAR = new char [256 ]; private static final char [] HEXDUMP_TABLE = new char [256 * 4 ]; private static final String[] HEXPADDING = new String[16 ]; private static final String[] HEXDUMP_ROWPREFIXES = new String[65536 >>> 4 ]; private static final String[] BYTE2HEX = new String[256 ]; private static final String[] BYTEPADDING = new String[16 ]; static { final char [] DIGITS = "0123456789abcdef" .toCharArray(); for (int i = 0 ; i < 256 ; i++) { HEXDUMP_TABLE[i << 1 ] = DIGITS[i >>> 4 & 0x0F ]; HEXDUMP_TABLE[(i << 1 ) + 1 ] = DIGITS[i & 0x0F ]; } int i; for (i = 0 ; i < HEXPADDING.length; i++) { int padding = HEXPADDING.length - i; StringBuilder buf = new StringBuilder(padding * 3 ); for (int j = 0 ; j < padding; j++) { buf.append(" " ); } HEXPADDING[i] = buf.toString(); } for (i = 0 ; i < HEXDUMP_ROWPREFIXES.length; i++) { StringBuilder buf = new StringBuilder(12 ); buf.append(NEWLINE); buf.append(Long.toHexString(i << 4 & 0xFFFFFFFFL | 0x100000000L )); buf.setCharAt(buf.length() - 9 , '|' ); buf.append('|' ); HEXDUMP_ROWPREFIXES[i] = buf.toString(); } for (i = 0 ; i < BYTE2HEX.length; i++) { BYTE2HEX[i] = ' ' + StringUtil.byteToHexStringPadded(i); } for (i = 0 ; i < BYTEPADDING.length; i++) { int padding = BYTEPADDING.length - i; StringBuilder buf = new StringBuilder(padding); for (int j = 0 ; j < padding; j++) { buf.append(' ' ); } BYTEPADDING[i] = buf.toString(); } for (i = 0 ; i < BYTE2CHAR.length; i++) { if (i <= 0x1f || i >= 0x7f ) { BYTE2CHAR[i] = '.' ; } else { BYTE2CHAR[i] = (char ) i; } } } public static void debugAll (ByteBuffer buffer) int oldlimit = buffer.limit(); buffer.limit(buffer.capacity()); StringBuilder origin = new StringBuilder(256 ); appendPrettyHexDump(origin, buffer, 0 , buffer.capacity()); System.out.println("+--------+-------------------- all ------------------------+----------------+" ); System.out.printf("position: [%d], limit: [%d]\n" , buffer.position(), oldlimit); System.out.println(origin); buffer.limit(oldlimit); } public static void debugRead (ByteBuffer buffer) StringBuilder builder = new StringBuilder(256 ); appendPrettyHexDump(builder, buffer, buffer.position(), buffer.limit() - buffer.position()); System.out.println("+--------+-------------------- read -----------------------+----------------+" ); System.out.printf("position: [%d], limit: [%d]\n" , buffer.position(), buffer.limit()); System.out.println(builder); } private static void appendPrettyHexDump (StringBuilder dump, ByteBuffer buf, int offset, int length) if (isOutOfBounds(offset, length, buf.capacity())) { throw new IndexOutOfBoundsException( "expected: " + "0 <= offset(" + offset + ") <= offset + length(" + length + ") <= " + "buf.capacity(" + buf.capacity() + ')' ); } if (length == 0 ) { return ; } dump.append( " +-------------------------------------------------+" + NEWLINE + " | 0 1 2 3 4 5 6 7 8 9 a b c d e f |" + NEWLINE + "+--------+-------------------------------------------------+----------------+" ); final int startIndex = offset; final int fullRows = length >>> 4 ; final int remainder = length & 0xF ; for (int row = 0 ; row < fullRows; row++) { int rowStartIndex = (row << 4 ) + startIndex; appendHexDumpRowPrefix(dump, row, rowStartIndex); int rowEndIndex = rowStartIndex + 16 ; for (int j = rowStartIndex; j < rowEndIndex; j++) { dump.append(BYTE2HEX[getUnsignedByte(buf, j)]); } dump.append(" |" ); for (int j = rowStartIndex; j < rowEndIndex; j++) { dump.append(BYTE2CHAR[getUnsignedByte(buf, j)]); } dump.append('|' ); } if (remainder != 0 ) { int rowStartIndex = (fullRows << 4 ) + startIndex; appendHexDumpRowPrefix(dump, fullRows, rowStartIndex); int rowEndIndex = rowStartIndex + remainder; for (int j = rowStartIndex; j < rowEndIndex; j++) { dump.append(BYTE2HEX[getUnsignedByte(buf, j)]); } dump.append(HEXPADDING[remainder]); dump.append(" |" ); for (int j = rowStartIndex; j < rowEndIndex; j++) { dump.append(BYTE2CHAR[getUnsignedByte(buf, j)]); } dump.append(BYTEPADDING[remainder]); dump.append('|' ); } dump.append(NEWLINE + "+--------+-------------------------------------------------+----------------+" ); } private static void appendHexDumpRowPrefix (StringBuilder dump, int row, int rowStartIndex) if (row < HEXDUMP_ROWPREFIXES.length) { dump.append(HEXDUMP_ROWPREFIXES[row]); } else { dump.append(NEWLINE); dump.append(Long.toHexString(rowStartIndex & 0xFFFFFFFFL | 0x100000000L )); dump.setCharAt(dump.length() - 9 , '|' ); dump.append('|' ); } } public static short getUnsignedByte (ByteBuffer buffer, int index) return (short ) (buffer.get(index) & 0xFF ); } }
2.3 ByteBuffer 常见方法 分配空间 可以使用 allocate 方法为 ByteBuffer 分配空间,其它 buffer 类也有该方法
1 2 3 4 5 6 7 8 9 10 11 12 13 14 15 16 17 package com.hongliang.netty.c1;import java.nio.ByteBuffer;public class AllocateByteBufferTest public static void main (String[] args) System.out.println(ByteBuffer.allocate(16 ).getClass()); System.out.println(ByteBuffer.allocateDirect(16 ).getClass()); } }
class java.nio.HeapByteBuffer : 堆中分配, 受到GC影响,读写效率低下
class java.nio.DirectByteBuffer: 直接内存, 读写效率高(少一次复制), 不会受GC影响,分配效率低(需要调用OS系统函数分配)。
向 buffer 写入数据 有两种办法
调用 channel 的 read 方法 调用 buffer 自己的 put 方法 1 int readBytes = channel.read(buf);
和
从 buffer 读取数据 同样有两种办法
调用 channel 的 write 方法 调用 buffer 自己的 get 方法 1 int writeBytes = channel.write(buf);
和
get 方法会让 position 读指针向后走,如果想重复读取数据
可以调用 rewind 方法将 position 重新置为 0 或者调用 get(int i) 方法获取索引 i 的内容,它不会移动读指针 mark 和 reset mark 是在读取时,做一个标记,即使 position 改变,只要调用 reset 就能回到 mark 的位置
注意
rewind 和 flip 都会清除 mark 位置
字符串与 ByteBuffer 互转 1 2 3 4 5 6 7 8 9 ByteBuffer buffer1 = StandardCharsets.UTF_8.encode("你好" ); ByteBuffer buffer2 = Charset.forName("utf-8" ).encode("你好" ); debug(buffer1); debug(buffer2); CharBuffer buffer3 = StandardCharsets.UTF_8.decode(buffer1); System.out.println(buffer3.getClass()); System.out.println(buffer3.toString());
输出
1 2 3 4 5 6 7 8 9 10 11 12 +-------------------------------------------------+ | 0 1 2 3 4 5 6 7 8 9 a b c d e f | +--------+-------------------------------------------------+----------------+ |00000000| e4 bd a0 e5 a5 bd |...... | +--------+-------------------------------------------------+----------------+ +-------------------------------------------------+ | 0 1 2 3 4 5 6 7 8 9 a b c d e f | +--------+-------------------------------------------------+----------------+ |00000000| e4 bd a0 e5 a5 bd |...... | +--------+-------------------------------------------------+----------------+ class java.nio.HeapCharBuffer 你好
⚠️ Buffer 的线程安全 Buffer 是非线程安全的
2.4 Scattering Reads 分散读取,有一个文本文件 3parts.txt
使用如下方式读取,可以将数据填充至多个 buffer
1 2 3 4 5 6 7 8 9 10 11 12 13 14 15 try (RandomAccessFile file = new RandomAccessFile("helloword/3parts.txt" , "rw" )) { FileChannel channel = file.getChannel(); ByteBuffer a = ByteBuffer.allocate(3 ); ByteBuffer b = ByteBuffer.allocate(3 ); ByteBuffer c = ByteBuffer.allocate(5 ); channel.read(new ByteBuffer[]{a, b, c}); a.flip(); b.flip(); c.flip(); debug(a); debug(b); debug(c); } catch (IOException e) { e.printStackTrace(); }
结果
1 2 3 4 5 6 7 8 9 10 11 12 13 14 15 +-------------------------------------------------+ | 0 1 2 3 4 5 6 7 8 9 a b c d e f | +--------+-------------------------------------------------+----------------+ |00000000| 6f 6e 65 |one | +--------+-------------------------------------------------+----------------+ +-------------------------------------------------+ | 0 1 2 3 4 5 6 7 8 9 a b c d e f | +--------+-------------------------------------------------+----------------+ |00000000| 74 77 6f |two | +--------+-------------------------------------------------+----------------+ +-------------------------------------------------+ | 0 1 2 3 4 5 6 7 8 9 a b c d e f | +--------+-------------------------------------------------+----------------+ |00000000| 74 68 72 65 65 |three | +--------+-------------------------------------------------+----------------+
2.5 Gathering Writes 使用如下方式写入,可以将多个 buffer 的数据填充至 channel
1 2 3 4 5 6 7 8 9 10 11 12 13 14 15 16 try (RandomAccessFile file = new RandomAccessFile("helloword/3parts.txt" , "rw" )) { FileChannel channel = file.getChannel(); ByteBuffer d = ByteBuffer.allocate(4 ); ByteBuffer e = ByteBuffer.allocate(4 ); channel.position(11 ); d.put(new byte []{'f' , 'o' , 'u' , 'r' }); e.put(new byte []{'f' , 'i' , 'v' , 'e' }); d.flip(); e.flip(); debug(d); debug(e); channel.write(new ByteBuffer[]{d, e}); } catch (IOException e) { e.printStackTrace(); }
输出
1 2 3 4 5 6 7 8 9 10 +-------------------------------------------------+ | 0 1 2 3 4 5 6 7 8 9 a b c d e f | +--------+-------------------------------------------------+----------------+ |00000000| 66 6f 75 72 |four | +--------+-------------------------------------------------+----------------+ +-------------------------------------------------+ | 0 1 2 3 4 5 6 7 8 9 a b c d e f | +--------+-------------------------------------------------+----------------+ |00000000| 66 69 76 65 |five | +--------+-------------------------------------------------+----------------+
文件内容
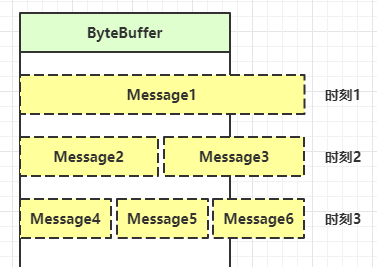
2.6 练习 网络上有多条数据发送给服务端,数据之间使用 \n 进行分隔
Hello,world\n I’m zhangsan\n How are you?\n 变成了下面的两个 byteBuffer (黏包,半包)
Hello,world\nI’m zhangsan\nHo w are you?\n 现在要求你编写程序,将错乱的数据恢复成原始的按 \n 分隔的数据
1 2 3 4 5 6 7 8 9 10 11 12 13 14 15 16 17 18 19 20 21 22 23 24 25 26 public static void main (String[] args) ByteBuffer source = ByteBuffer.allocate(32 ); source.put("Hello,world\nI'm zhangsan\nHo" .getBytes()); split(source); source.put("w are you?\nhaha!\n" .getBytes()); split(source); } private static void split (ByteBuffer source) source.flip(); int oldLimit = source.limit(); for (int i = 0 ; i < oldLimit; i++) { if (source.get(i) == '\n' ) { System.out.println(i); ByteBuffer target = ByteBuffer.allocate(i + 1 - source.position()); source.limit(i + 1 ); target.put(source); debugAll(target); source.limit(oldLimit); } } source.compact(); }
3. 文件编程 3.1 FileChannel ⚠️ FileChannel 工作模式 FileChannel 只能工作在阻塞模式下
获取 不能直接打开 FileChannel,必须通过 FileInputStream、FileOutputStream 或者 RandomAccessFile 来获取 FileChannel,它们都有 getChannel 方法
通过 FileInputStream 获取的 channel 只能读 通过 FileOutputStream 获取的 channel 只能写 通过 RandomAccessFile 是否能读写根据构造 RandomAccessFile 时的读写模式决定 读取 会从 channel 读取数据填充 ByteBuffer,返回值表示读到了多少字节,-1 表示到达了文件的末尾
1 int readBytes = channel.read(buffer);
写入 写入的正确姿势如下, SocketChannel
1 2 3 4 5 6 7 ByteBuffer buffer = ...; buffer.put(...); buffer.flip(); while (buffer.hasRemaining()) { channel.write(buffer); }
在 while 中调用 channel.write 是因为 write 方法并不能保证一次将 buffer 中的内容全部写入 channel
关闭 channel 必须关闭,不过调用了 FileInputStream、FileOutputStream 或者 RandomAccessFile 的 close 方法会间接地调用 channel 的 close 方法
位置 获取当前位置
1 long pos = channel.position();
设置当前位置
1 2 long newPos = ...;channel.position(newPos);
设置当前位置时,如果设置为文件的末尾
这时读取会返回 -1 这时写入,会追加内容,但要注意如果 position 超过了文件末尾,再写入时在新内容和原末尾之间会有空洞(00) 大小 使用 size 方法获取文件的大小
强制写入 操作系统出于性能的考虑,会将数据缓存,不是立刻写入磁盘。可以调用 force(true) 方法将文件内容和元数据(文件的权限等信息)立刻写入磁盘
3.2 两个 Channel 传输数据 1 2 3 4 5 6 7 8 9 10 11 12 String FROM = "helloword/data.txt" ; String TO = "helloword/to.txt" ; long start = System.nanoTime();try (FileChannel from = new FileInputStream(FROM).getChannel(); FileChannel to = new FileOutputStream(TO).getChannel(); ) { from.transferTo(0 , from.size(), to); } catch (IOException e) { e.printStackTrace(); } long end = System.nanoTime();System.out.println("transferTo 用时:" + (end - start) / 1000_000.0 );
输出
超过 2g 大小的文件传输
1 2 3 4 5 6 7 8 9 10 11 12 13 14 15 16 17 18 public class TestFileChannelTransferTo public static void main (String[] args) try ( FileChannel from = new FileInputStream("data.txt" ).getChannel(); FileChannel to = new FileOutputStream("to.txt" ).getChannel(); ) { long size = from.size(); for (long left = size; left > 0 ; ) { System.out.println("position:" + (size - left) + " left:" + left); left -= from.transferTo((size - left), left, to); } } catch (IOException e) { e.printStackTrace(); } } }
实际传输一个超大文件
1 2 3 4 position:0 left:7769948160 position:2147483647 left:5622464513 position:4294967294 left:3474980866 position:6442450941 left:1327497219
3.3 Path jdk7 引入了 Path 和 Paths 类
Path 用来表示文件路径 Paths 是工具类,用来获取 Path 实例 1 2 3 4 5 6 7 Path source = Paths.get("1.txt" ); Path source = Paths.get("d:\\1.txt" ); Path source = Paths.get("d:/1.txt" ); Path projects = Paths.get("d:\\data" , "projects" );
例如目录结构如下
1 2 3 4 5 d: |- data |- projects |- a |- b
代码
1 2 3 Path path = Paths.get("d:\\data\\projects\\a\\..\\b" ); System.out.println(path); System.out.println(path.normalize());
会输出
1 2 d:\data\projects\a\..\b d:\data\projects\b
3.4 Files 检查文件是否存在
1 2 Path path = Paths.get("helloword/data.txt" ); System.out.println(Files.exists(path));
创建一级目录
1 2 Path path = Paths.get("helloword/d1" ); Files.createDirectory(path);
如果目录已存在,会抛异常 FileAlreadyExistsException 不能一次创建多级目录,否则会抛异常 NoSuchFileException 创建多级目录用
1 2 Path path = Paths.get("helloword/d1/d2" ); Files.createDirectories(path);
拷贝文件
1 2 3 4 Path source = Paths.get("helloword/data.txt" ); Path target = Paths.get("helloword/target.txt" ); Files.copy(source, target);
如果文件已存在,会抛异常 FileAlreadyExistsException 如果希望用 source 覆盖掉 target,需要用 StandardCopyOption 来控制
1 Files.copy(source, target, StandardCopyOption.REPLACE_EXISTING);
移动文件
1 2 3 4 Path source = Paths.get("helloword/data.txt" ); Path target = Paths.get("helloword/data.txt" ); Files.move(source, target, StandardCopyOption.ATOMIC_MOVE);
StandardCopyOption.ATOMIC_MOVE 保证文件移动的原子性 删除文件
1 2 3 Path target = Paths.get("helloword/target.txt" ); Files.delete(target);
如果文件不存在,会抛异常 NoSuchFileException 删除目录
1 2 3 Path target = Paths.get("helloword/d1" ); Files.delete(target);
如果目录还有内容,会抛异常 DirectoryNotEmptyException 遍历目录文件
1 2 3 4 5 6 7 8 9 10 11 12 13 14 15 16 17 18 19 20 21 22 23 24 public static void main (String[] args) throws IOException Path path = Paths.get("C:\\Program Files\\Java\\jdk1.8.0_91" ); AtomicInteger dirCount = new AtomicInteger(); AtomicInteger fileCount = new AtomicInteger(); Files.walkFileTree(path, new SimpleFileVisitor<Path>(){ @Override public FileVisitResult preVisitDirectory (Path dir, BasicFileAttributes attrs) throws IOException { System.out.println(dir); dirCount.incrementAndGet(); return super .preVisitDirectory(dir, attrs); } @Override public FileVisitResult visitFile (Path file, BasicFileAttributes attrs) throws IOException { System.out.println(file); fileCount.incrementAndGet(); return super .visitFile(file, attrs); } }); System.out.println(dirCount); System.out.println(fileCount); }
统计 jar 的数目
1 2 3 4 5 6 7 8 9 10 11 12 13 Path path = Paths.get("C:\\Program Files\\Java\\jdk1.8.0_91" ); AtomicInteger fileCount = new AtomicInteger(); Files.walkFileTree(path, new SimpleFileVisitor<Path>(){ @Override public FileVisitResult visitFile (Path file, BasicFileAttributes attrs) throws IOException { if (file.toFile().getName().endsWith(".jar" )) { fileCount.incrementAndGet(); } return super .visitFile(file, attrs); } }); System.out.println(fileCount);
删除多级目录
1 2 3 4 5 6 7 8 9 10 11 12 13 14 15 16 Path path = Paths.get("d:\\a" ); Files.walkFileTree(path, new SimpleFileVisitor<Path>(){ @Override public FileVisitResult visitFile (Path file, BasicFileAttributes attrs) throws IOException { Files.delete(file); return super .visitFile(file, attrs); } @Override public FileVisitResult postVisitDirectory (Path dir, IOException exc) throws IOException { Files.delete(dir); return super .postVisitDirectory(dir, exc); } });
⚠️ 删除很危险 删除是危险操作,确保要递归删除的文件夹没有重要内容
拷贝多级目录
1 2 3 4 5 6 7 8 9 10 11 12 13 14 15 16 17 18 19 20 21 long start = System.currentTimeMillis();String source = "D:\\Snipaste-1.16.2-x64" ; String target = "D:\\Snipaste-1.16.2-x64aaa" ; Files.walk(Paths.get(source)).forEach(path -> { try { String targetName = path.toString().replace(source, target); if (Files.isDirectory(path)) { Files.createDirectory(Paths.get(targetName)); } else if (Files.isRegularFile(path)) { Files.copy(path, Paths.get(targetName)); } } catch (IOException e) { e.printStackTrace(); } }); long end = System.currentTimeMillis();System.out.println(end - start);
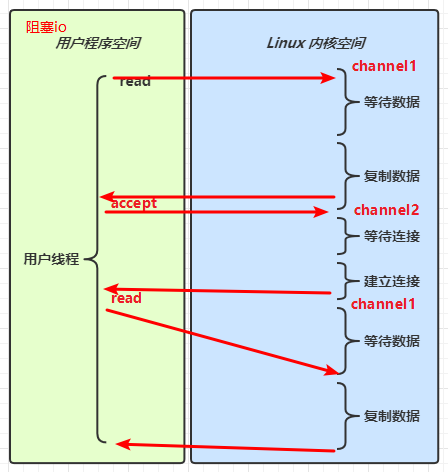
4. 网络编程 4.1 非阻塞 vs 阻塞 阻塞 阻塞模式下,相关方法都会导致线程暂停ServerSocketChannel.accept 会在没有连接建立时让线程暂停 SocketChannel.read 会在没有数据可读时让线程暂停 阻塞的表现其实就是线程暂停了,暂停期间不会占用 cpu,但线程相当于闲置 单线程下,阻塞方法之间相互影响,几乎不能正常工作,需要多线程支持 但多线程下,有新的问题,体现在以下方面32 位 jvm 一个线程 320k,64 位 jvm 一个线程 1024k,如果连接数过多,必然导致 OOM,并且线程太多,反而会因为频繁上下文切换导致性能降低 可以采用线程池技术来减少线程数和线程上下文切换,但治标不治本,如果有很多连接建立,但长时间 inactive,会阻塞线程池中所有线程,因此不适合长连接,只适合短连接 服务器端
1 2 3 4 5 6 7 8 9 10 11 12 13 14 15 16 17 18 19 20 21 22 23 24 25 26 27 ByteBuffer buffer = ByteBuffer.allocate(16 ); ServerSocketChannel ssc = ServerSocketChannel.open(); ssc.bind(new InetSocketAddress(8080 )); List<SocketChannel> channels = new ArrayList<>(); while (true ) { log.debug("connecting..." ); SocketChannel sc = ssc.accept(); log.debug("connected... {}" , sc); channels.add(sc); for (SocketChannel channel : channels) { log.debug("before read... {}" , channel); channel.read(buffer); buffer.flip(); debugRead(buffer); buffer.clear(); log.debug("after read...{}" , channel); } }
客户端
1 2 3 SocketChannel sc = SocketChannel.open(); sc.connect(new InetSocketAddress("localhost" , 8080 )); System.out.println("waiting..." );
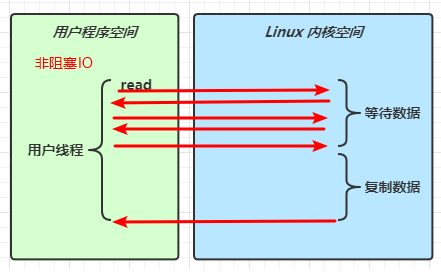
非阻塞 非阻塞模式下,相关方法都会不会让线程暂停在 ServerSocketChannel.accept 在没有连接建立时,会返回 null,继续运行 SocketChannel.read 在没有数据可读时,会返回 0,但线程不必阻塞,可以去执行其它 SocketChannel 的 read 或是去执行 ServerSocketChannel.accept 写数据时,线程只是等待数据写入 Channel 即可,无需等 Channel 通过网络把数据发送出去 但非阻塞模式下,即使没有连接建立,和可读数据,线程仍然在不断运行,白白浪费了 cpu 数据复制过程中,线程实际还是阻塞的(AIO 改进的地方) 服务器端,客户端代码不变
1 2 3 4 5 6 7 8 9 10 11 12 13 14 15 16 17 18 19 20 21 22 23 24 25 26 27 28 29 ByteBuffer buffer = ByteBuffer.allocate(16 ); ServerSocketChannel ssc = ServerSocketChannel.open(); ssc.configureBlocking(false ); ssc.bind(new InetSocketAddress(8080 )); List<SocketChannel> channels = new ArrayList<>(); while (true ) { SocketChannel sc = ssc.accept(); if (sc != null ) { log.debug("connected... {}" , sc); sc.configureBlocking(false ); channels.add(sc); } for (SocketChannel channel : channels) { int read = channel.read(buffer); if (read > 0 ) { buffer.flip(); debugRead(buffer); buffer.clear(); log.debug("after read...{}" , channel); } } }
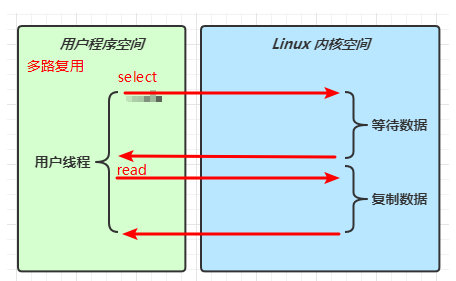
多路复用 单线程可以配合 Selector 完成对多个 Channel 可读写事件的监控,这称之为多路复用
多路复用仅针对网络 IO、普通文件 IO 没法利用多路复用 如果不用 Selector 的非阻塞模式,线程大部分时间都在做无用功,而 Selector 能够保证有可连接事件时才去连接 有可读事件才去读取 有可写事件才去写入限于网络传输能力,Channel 未必时时可写,一旦 Channel 可写,会触发 Selector 的可写事件 4.2 Selector 1 2 3 4 5 6 7 graph TD subgraph selector 版 thread --> selector selector --> c1(channel) selector --> c2(channel) selector --> c3(channel) end
好处
一个线程配合 selector 就可以监控多个 channel 的事件,事件发生线程才去处理。避免非阻塞模式下所做无用功 让这个线程能够被充分利用 节约了线程的数量 减少了线程上下文切换 创建 1 Selector selector = Selector.open();
绑定 Channel 事件 也称之为注册事件,绑定的事件 selector 才会关心
1 2 channel.configureBlocking(false ); SelectionKey key = channel.register(selector, 绑定事件);
channel 必须工作在非阻塞模式 FileChannel 没有非阻塞模式,因此不能配合 selector 一起使用 绑定的事件类型可以有connect - 客户端连接成功时触发 accept - 服务器端成功接受连接时触发 read - 数据可读入时触发,有因为接收能力弱,数据暂不能读入的情况 write - 数据可写出时触发,有因为发送能力弱,数据暂不能写出的情况 监听 Channel 事件 可以通过下面三种方法来监听是否有事件发生,方法的返回值代表有多少 channel 发生了事件
方法1,阻塞直到绑定事件发生
1 int count = selector.select();
方法2,阻塞直到绑定事件发生,或是超时(时间单位为 ms)
1 int count = selector.select(long timeout);
方法3,不会阻塞,也就是不管有没有事件,立刻返回,自己根据返回值检查是否有事件
1 int count = selector.selectNow();
💡 select 何时不阻塞 事件发生时客户端发起连接请求,会触发 accept 事件 客户端发送数据过来,客户端正常、异常关闭时,都会触发 read 事件,另外如果发送的数据大于 buffer 缓冲区,会触发多次读取事件 channel 可写,会触发 write 事件 在 linux 下 nio bug 发生时 调用 selector.wakeup() 调用 selector.close() selector 所在线程 interrupt 4.3 处理 accept 事件 客户端代码为
1 2 3 4 5 6 7 8 9 10 11 public class Client public static void main (String[] args) try (Socket socket = new Socket("localhost" , 8080 )) { System.out.println(socket); socket.getOutputStream().write("world" .getBytes()); System.in.read(); } catch (IOException e) { e.printStackTrace(); } } }
服务器端代码为
1 2 3 4 5 6 7 8 9 10 11 12 13 14 15 16 17 18 19 20 21 22 23 24 25 26 27 28 29 30 31 32 33 34 35 36 37 38 39 40 41 @Slf4j public class ChannelDemo6 public static void main (String[] args) try (ServerSocketChannel channel = ServerSocketChannel.open()) { channel.bind(new InetSocketAddress(8080 )); System.out.println(channel); Selector selector = Selector.open(); channel.configureBlocking(false ); channel.register(selector, SelectionKey.OP_ACCEPT); while (true ) { int count = selector.select(); log.debug("select count: {}" , count); Set<SelectionKey> keys = selector.selectedKeys(); Iterator<SelectionKey> iter = keys.iterator(); while (iter.hasNext()) { SelectionKey key = iter.next(); if (key.isAcceptable()) { ServerSocketChannel c = (ServerSocketChannel) key.channel(); SocketChannel sc = c.accept(); log.debug("{}" , sc); } iter.remove(); } } } catch (IOException e) { e.printStackTrace(); } } }
💡 事件发生后能否不处理 事件发生后,要么处理,要么取消(cancel),不能什么都不做,否则下次该事件仍会触发,这是因为 nio 底层使用的是水平触发
4.4 处理 read 事件 1 2 3 4 5 6 7 8 9 10 11 12 13 14 15 16 17 18 19 20 21 22 23 24 25 26 27 28 29 30 31 32 33 34 35 36 37 38 39 40 41 42 43 44 45 46 47 48 49 50 51 52 53 54 @Slf4j public class ChannelDemo6 public static void main (String[] args) try (ServerSocketChannel channel = ServerSocketChannel.open()) { channel.bind(new InetSocketAddress(8080 )); System.out.println(channel); Selector selector = Selector.open(); channel.configureBlocking(false ); channel.register(selector, SelectionKey.OP_ACCEPT); while (true ) { int count = selector.select(); log.debug("select count: {}" , count); Set<SelectionKey> keys = selector.selectedKeys(); Iterator<SelectionKey> iter = keys.iterator(); while (iter.hasNext()) { SelectionKey key = iter.next(); if (key.isAcceptable()) { ServerSocketChannel c = (ServerSocketChannel) key.channel(); SocketChannel sc = c.accept(); sc.configureBlocking(false ); sc.register(selector, SelectionKey.OP_READ); log.debug("连接已建立: {}" , sc); } else if (key.isReadable()) { SocketChannel sc = (SocketChannel) key.channel(); ByteBuffer buffer = ByteBuffer.allocate(128 ); int read = sc.read(buffer); if (read == -1 ) { key.cancel(); sc.close(); } else { buffer.flip(); debug(buffer); } } iter.remove(); } } } catch (IOException e) { e.printStackTrace(); } } }
开启两个客户端,修改一下发送文字,输出
1 2 3 4 5 6 7 8 9 10 11 12 13 14 15 16 17 sun.nio.ch.ServerSocketChannelImpl[/0:0:0:0:0:0:0:0:8080] 21:16:39 [DEBUG] [main] c.i.n.ChannelDemo6 - select count: 1 21:16:39 [DEBUG] [main] c.i.n.ChannelDemo6 - 连接已建立: java.nio.channels.SocketChannel[connected local=/127.0.0.1:8080 remote=/127.0.0.1:60367] 21:16:39 [DEBUG] [main] c.i.n.ChannelDemo6 - select count: 1 +-------------------------------------------------+ | 0 1 2 3 4 5 6 7 8 9 a b c d e f | +--------+-------------------------------------------------+----------------+ |00000000| 68 65 6c 6c 6f |hello | +--------+-------------------------------------------------+----------------+ 21:16:59 [DEBUG] [main] c.i.n.ChannelDemo6 - select count: 1 21:16:59 [DEBUG] [main] c.i.n.ChannelDemo6 - 连接已建立: java.nio.channels.SocketChannel[connected local=/127.0.0.1:8080 remote=/127.0.0.1:60378] 21:16:59 [DEBUG] [main] c.i.n.ChannelDemo6 - select count: 1 +-------------------------------------------------+ | 0 1 2 3 4 5 6 7 8 9 a b c d e f | +--------+-------------------------------------------------+----------------+ |00000000| 77 6f 72 6c 64 |world | +--------+-------------------------------------------------+----------------+
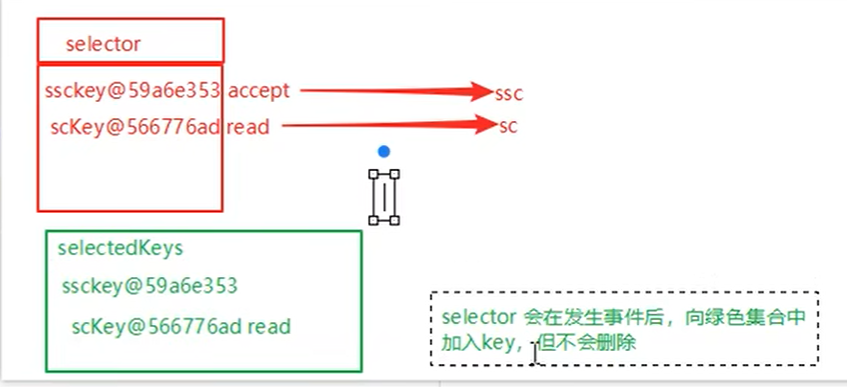
💡 为何要 iter.remove() 因为 select 在事件发生后,就会将相关的 key 放入 selectedKeys 集合,但不会在处理完后从 selectedKeys 集合中移除,需要我们自己编码删除。例如
第一次触发了 ssckey 上的 accept 事件,没有移除 ssckey 第二次触发了 sckey 上的 read 事件,但这时 selectedKeys 中还有上次的 ssckey ,在处理时因为没有真正的 serverSocket 连上了,就会导致空指针异常 💡 cancel 的作用 cancel 会取消注册在 selector 上的 channel,并从 keys 集合中删除 key 后续不会再监听事件
客户端断开后会触发read事件, 需要将key取消(从selector的keys集合中真正删除 key)
不论是异常断开还是正常断开(sc.close()),都会触发读事件。
1 2 3 4 int read = channel.read(buffer); if (read == -1 ){ key.cancel(); }
⚠️ 不处理边界的问题 以前有同学写过这样的代码,思考注释中两个问题,以 bio 为例,其实 nio 道理是一样的
1 2 3 4 5 6 7 8 9 10 11 12 13 14 15 16 17 18 19 public class Server public static void main (String[] args) throws IOException ServerSocket ss=new ServerSocket(9000 ); while (true ) { Socket s = ss.accept(); InputStream in = s.getInputStream(); byte [] arr = new byte [4 ]; while (true ) { int read = in.read(arr); if (read == -1 ) { break ; } System.out.println(new String(arr, 0 , read)); } } } }
客户端
1 2 3 4 5 6 7 8 9 10 public class Client public static void main (String[] args) throws IOException Socket max = new Socket("localhost" , 9000 ); OutputStream out = max.getOutputStream(); out.write("hello" .getBytes()); out.write("world" .getBytes()); out.write("你好" .getBytes()); max.close(); } }
输出
为什么?
处理消息的边界 一种思路是固定消息长度,数据包大小一样,服务器按预定长度读取,缺点是浪费带宽 另一种思路是按分隔符拆分,缺点是效率低 TLV 格式,即 Type 类型、Length 长度、Value 数据,类型和长度已知的情况下,就可以方便获取消息大小,分配合适的 buffer,缺点是 buffer 需要提前分配,如果内容过大,则影响 server 吞吐量Http 1.1 是 TLV 格式 Http 2.0 是 LTV 格式 1 2 3 4 5 6 7 8 9 10 11 sequenceDiagram participant c1 as 客户端1 participant s as 服务器 participant b1 as ByteBuffer1 participant b2 as ByteBuffer2 c1 ->> s: 发送 01234567890abcdef3333\r s ->> b1: 第一次 read 存入 01234567890abcdef s ->> b2: 扩容 b1 ->> b2: 拷贝 01234567890abcdef s ->> b2: 第二次 read 存入 3333\r b2 ->> b2: 01234567890abcdef3333\r
服务器端
1 2 3 4 5 6 7 8 9 10 11 12 13 14 15 16 17 18 19 20 21 22 23 24 25 26 27 28 29 30 31 32 33 34 35 36 37 38 39 40 41 42 43 44 45 46 47 48 49 50 51 52 53 54 55 56 57 58 59 60 61 62 63 64 65 66 67 68 69 70 71 72 73 74 75 76 77 78 79 private static void split (ByteBuffer source) source.flip(); for (int i = 0 ; i < source.limit(); i++) { if (source.get(i) == '\n' ) { int length = i + 1 - source.position(); ByteBuffer target = ByteBuffer.allocate(length); for (int j = 0 ; j < length; j++) { target.put(source.get()); } debugAll(target); } } source.compact(); } public static void main (String[] args) throws IOException Selector selector = Selector.open(); ServerSocketChannel ssc = ServerSocketChannel.open(); ssc.configureBlocking(false ); SelectionKey sscKey = ssc.register(selector, 0 , null ); sscKey.interestOps(SelectionKey.OP_ACCEPT); log.debug("sscKey:{}" , sscKey); ssc.bind(new InetSocketAddress(8080 )); while (true ) { selector.select(); Iterator<SelectionKey> iter = selector.selectedKeys().iterator(); while (iter.hasNext()) { SelectionKey key = iter.next(); iter.remove(); log.debug("key: {}" , key); if (key.isAcceptable()) { ServerSocketChannel channel = (ServerSocketChannel) key.channel(); SocketChannel sc = channel.accept(); sc.configureBlocking(false ); ByteBuffer buffer = ByteBuffer.allocate(16 ); SelectionKey scKey = sc.register(selector, 0 , buffer); scKey.interestOps(SelectionKey.OP_READ); log.debug("{}" , sc); log.debug("scKey:{}" , scKey); } else if (key.isReadable()) { try { SocketChannel channel = (SocketChannel) key.channel(); ByteBuffer buffer = (ByteBuffer) key.attachment(); int read = channel.read(buffer); if (read == -1 ) { key.cancel(); } else { split(buffer); if (buffer.position() == buffer.limit()) { ByteBuffer newBuffer = ByteBuffer.allocate(buffer.capacity() * 2 ); buffer.flip(); newBuffer.put(buffer); key.attach(newBuffer); } } } catch (IOException e) { e.printStackTrace(); key.cancel(); } } } } }
客户端
1 2 3 4 5 6 7 SocketChannel sc = SocketChannel.open(); sc.connect(new InetSocketAddress("localhost" , 8080 )); SocketAddress address = sc.getLocalAddress(); sc.write(Charset.defaultCharset().encode("0123\n456789abcdef" )); sc.write(Charset.defaultCharset().encode("0123456789abcdef3333\n" )); System.in.read();
ByteBuffer 大小分配 每个 channel 都需要记录可能被切分的消息,因为 ByteBuffer 不能被多个 channel 共同使用,因此需要为每个 channel 维护一个独立的 ByteBuffer ByteBuffer 不能太大,比如一个 ByteBuffer 1Mb 的话,要支持百万连接就要 1Tb 内存,因此需要设计大小可变的 ByteBuffer 4.5 处理 write 事件 一次无法写完例子 非阻塞模式下,无法保证把 buffer 中所有数据都写入 channel,因此需要追踪 write 方法的返回值(代表实际写入字节数) 用 selector 监听所有 channel 的可写事件,每个 channel 都需要一个 key 来跟踪 buffer,但这样又会导致占用内存过多,就有两阶段策略当消息处理器第一次写入消息时,才将 channel 注册到 selector 上 selector 检查 channel 上的可写事件,如果所有的数据写完了,就取消 channel 的注册 如果不取消,会每次可写均会触发 write 事件 1 2 3 4 5 6 7 8 9 10 11 12 13 14 15 16 17 18 19 20 21 22 23 24 25 26 27 28 29 30 31 32 33 34 35 36 37 38 39 40 41 42 43 44 45 46 47 48 49 50 51 52 public class WriteServer public static void main (String[] args) throws IOException ServerSocketChannel ssc = ServerSocketChannel.open(); ssc.configureBlocking(false ); ssc.bind(new InetSocketAddress(8080 )); Selector selector = Selector.open(); ssc.register(selector, SelectionKey.OP_ACCEPT); while (true ) { selector.select(); Iterator<SelectionKey> iter = selector.selectedKeys().iterator(); while (iter.hasNext()) { SelectionKey key = iter.next(); iter.remove(); if (key.isAcceptable()) { SocketChannel sc = ssc.accept(); sc.configureBlocking(false ); SelectionKey sckey = sc.register(selector, SelectionKey.OP_READ); StringBuilder sb = new StringBuilder(); for (int i = 0 ; i < 3000000 ; i++) { sb.append("a" ); } ByteBuffer buffer = Charset.defaultCharset().encode(sb.toString()); int write = sc.write(buffer); System.out.println("实际写入字节:" + write); if (buffer.hasRemaining()) { sckey.interestOps(sckey.interestOps() + SelectionKey.OP_WRITE); sckey.attach(buffer); } } else if (key.isWritable()) { ByteBuffer buffer = (ByteBuffer) key.attachment(); SocketChannel sc = (SocketChannel) key.channel(); int write = sc.write(buffer); System.out.println("实际写入字节:" + write); if (!buffer.hasRemaining()) { key.interestOps(key.interestOps() - SelectionKey.OP_WRITE); key.attach(null ); } } } } } }
客户端
1 2 3 4 5 6 7 8 9 10 11 12 13 14 15 16 17 18 19 20 21 22 23 24 25 26 public class WriteClient public static void main (String[] args) throws IOException Selector selector = Selector.open(); SocketChannel sc = SocketChannel.open(); sc.configureBlocking(false ); sc.register(selector, SelectionKey.OP_CONNECT | SelectionKey.OP_READ); sc.connect(new InetSocketAddress("localhost" , 8080 )); int count = 0 ; while (true ) { selector.select(); Iterator<SelectionKey> iter = selector.selectedKeys().iterator(); while (iter.hasNext()) { SelectionKey key = iter.next(); iter.remove(); if (key.isConnectable()) { System.out.println(sc.finishConnect()); } else if (key.isReadable()) { ByteBuffer buffer = ByteBuffer.allocate(1024 * 1024 ); count += sc.read(buffer); buffer.clear(); System.out.println(count); } } } } }
💡 write 为何要取消 只要向 channel 发送数据时,socket 缓冲可写,这个事件会频繁触发,因此应当只在 socket 缓冲区写不下时再关注可写事件,数据写完之后再取消关注
4.6 更进一步 💡 利用多线程优化 现在都是多核 cpu,设计时要充分考虑别让 cpu 的力量被白白浪费
前面的代码只有一个选择器,没有充分利用多核 cpu,如何改进呢?
分两组选择器
单线程配一个选择器,专门处理 accept 事件 创建 cpu 核心数的线程,每个线程配一个选择器,轮流处理 read 事件 1 2 3 4 5 6 7 8 9 10 11 12 13 14 15 16 17 18 19 20 21 22 23 24 25 26 27 28 29 30 31 32 33 34 35 36 37 38 39 40 41 42 43 44 45 46 47 48 49 50 51 52 53 54 55 56 57 58 59 60 61 62 63 64 65 66 67 68 69 70 71 72 73 74 75 76 77 78 79 80 81 82 83 84 85 86 87 88 89 90 91 92 93 94 95 96 97 98 99 100 101 102 103 104 105 106 107 108 109 110 111 112 113 114 115 116 117 118 119 120 121 122 123 124 125 126 127 128 129 130 131 132 public class ChannelDemo7 public static void main (String[] args) throws IOException new BossEventLoop().register(); } @Slf4j static class BossEventLoop implements Runnable private Selector boss; private WorkerEventLoop[] workers; private volatile boolean start = false ; AtomicInteger index = new AtomicInteger(); public void register () throws IOException if (!start) { ServerSocketChannel ssc = ServerSocketChannel.open(); ssc.bind(new InetSocketAddress(8080 )); ssc.configureBlocking(false ); boss = Selector.open(); SelectionKey ssckey = ssc.register(boss, 0 , null ); ssckey.interestOps(SelectionKey.OP_ACCEPT); workers = initEventLoops(); new Thread(this , "boss" ).start(); log.debug("boss start..." ); start = true ; } } public WorkerEventLoop[] initEventLoops() { WorkerEventLoop[] workerEventLoops = new WorkerEventLoop[2 ]; for (int i = 0 ; i < workerEventLoops.length; i++) { workerEventLoops[i] = new WorkerEventLoop(i); } return workerEventLoops; } @Override public void run () while (true ) { try { boss.select(); Iterator<SelectionKey> iter = boss.selectedKeys().iterator(); while (iter.hasNext()) { SelectionKey key = iter.next(); iter.remove(); if (key.isAcceptable()) { ServerSocketChannel c = (ServerSocketChannel) key.channel(); SocketChannel sc = c.accept(); sc.configureBlocking(false ); log.debug("{} connected" , sc.getRemoteAddress()); workers[index.getAndIncrement() % workers.length].register(sc); } } } catch (IOException e) { e.printStackTrace(); } } } } @Slf4j static class WorkerEventLoop implements Runnable private Selector worker; private volatile boolean start = false ; private int index; private final ConcurrentLinkedQueue<Runnable> tasks = new ConcurrentLinkedQueue<>(); public WorkerEventLoop (int index) this .index = index; } public void register (SocketChannel sc) throws IOException if (!start) { worker = Selector.open(); new Thread(this , "worker-" + index).start(); start = true ; } tasks.add(() -> { try { SelectionKey sckey = sc.register(worker, 0 , null ); sckey.interestOps(SelectionKey.OP_READ); worker.selectNow(); } catch (IOException e) { e.printStackTrace(); } }); worker.wakeup(); } @Override public void run () while (true ) { try { worker.select(); Runnable task = tasks.poll(); if (task != null ) { task.run(); } Set<SelectionKey> keys = worker.selectedKeys(); Iterator<SelectionKey> iter = keys.iterator(); while (iter.hasNext()) { SelectionKey key = iter.next(); if (key.isReadable()) { SocketChannel sc = (SocketChannel) key.channel(); ByteBuffer buffer = ByteBuffer.allocate(128 ); try { int read = sc.read(buffer); if (read == -1 ) { key.cancel(); sc.close(); } else { buffer.flip(); log.debug("{} message:" , sc.getRemoteAddress()); debugAll(buffer); } } catch (IOException e) { e.printStackTrace(); key.cancel(); sc.close(); } } iter.remove(); } } catch (IOException e) { e.printStackTrace(); } } } } }
💡 如何拿到 cpu 个数 Runtime.getRuntime().availableProcessors() 如果工作在 docker 容器下,因为容器不是物理隔离的,会拿到物理 cpu 个数,而不是容器申请时的个数 这个问题直到 jdk 10 才修复,使用 jvm 参数 UseContainerSupport 配置, 默认开启 4.7 UDP UDP 是无连接的,client 发送数据不会管 server 是否开启 server 这边的 receive 方法会将接收到的数据存入 byte buffer,但如果数据报文超过 buffer 大小,多出来的数据会被默默抛弃 首先启动服务器端
1 2 3 4 5 6 7 8 9 10 11 12 13 14 public class UdpServer public static void main (String[] args) try (DatagramChannel channel = DatagramChannel.open()) { channel.socket().bind(new InetSocketAddress(9999 )); System.out.println("waiting..." ); ByteBuffer buffer = ByteBuffer.allocate(32 ); channel.receive(buffer); buffer.flip(); debug(buffer); } catch (IOException e) { e.printStackTrace(); } } }
输出
运行客户端
1 2 3 4 5 6 7 8 9 10 11 public class UdpClient public static void main (String[] args) try (DatagramChannel channel = DatagramChannel.open()) { ByteBuffer buffer = StandardCharsets.UTF_8.encode("hello" ); InetSocketAddress address = new InetSocketAddress("localhost" , 9999 ); channel.send(buffer, address); } catch (Exception e) { e.printStackTrace(); } } }
接下来服务器端输出
1 2 3 4 5 +-------------------------------------------------+ | 0 1 2 3 4 5 6 7 8 9 a b c d e f | +--------+-------------------------------------------------+----------------+ |00000000| 68 65 6c 6c 6f |hello | +--------+-------------------------------------------------+----------------+
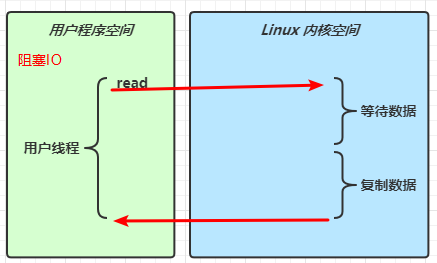
5. NIO vs BIO 5.1 stream vs channel stream 不会自动缓冲数据,channel 会利用系统提供的发送缓冲区、接收缓冲区(更为底层) stream 仅支持阻塞 API,channel 同时支持阻塞、非阻塞 API,网络 channel 可配合 selector 实现多路复用 二者均为全双工,即读写可以同时进行 5.2 IO 模型 同步阻塞、同步非阻塞、同步多路复用、异步阻塞(没有此情况)、异步非阻塞
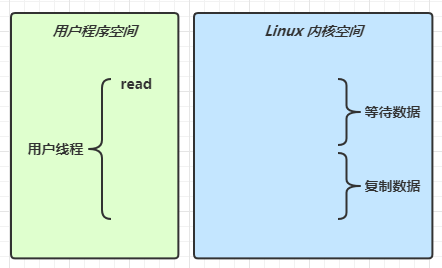
同步:线程自己去获取结果(一个线程) 异步:线程自己不去获取结果,而是由其它线程送结果(至少两个线程) 当调用一次 channel.read 或 stream.read 后,会切换至操作系统内核态来完成真正数据读取,而读取又分为两个阶段,分别为:
阻塞 IO
非阻塞 IO
多路复用
信号驱动
异步 IO
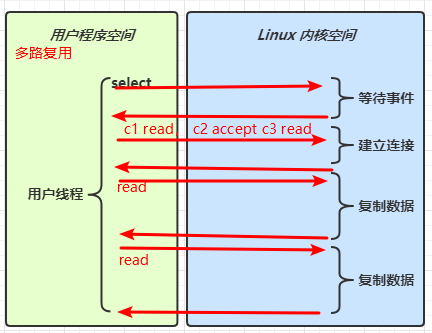
阻塞 IO vs 多路复用
🔖 参考 UNIX 网络编程 - 卷 I
5.3 零拷贝 传统 IO 问题 传统的 IO 将一个文件通过 socket 写出
1 2 3 4 5 6 7 8 File f = new File("helloword/data.txt" ); RandomAccessFile file = new RandomAccessFile(file, "r" ); byte [] buf = new byte [(int )f.length()];file.read(buf); Socket socket = ...; socket.getOutputStream().write(buf);
内部工作流程是这样的:
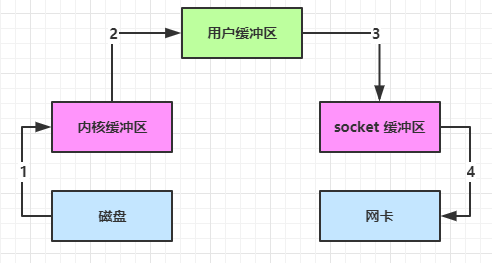
java 本身并不具备 IO 读写能力,因此 read 方法调用后,要从 java 程序的用户态 切换至内核态 ,去调用操作系统(Kernel)的读能力,将数据读入内核缓冲区 。这期间用户线程阻塞,操作系统使用 DMA(Direct Memory Access)来实现文件读,其间也不会使用 cpu
DMA 也可以理解为硬件单元,用来解放 cpu 完成文件 IO
从内核态 切换回用户态 ,将数据从内核缓冲区 读入用户缓冲区 (即 byte[] buf),这期间 cpu 会参与拷贝,无法利用 DMA
调用 write 方法,这时将数据从用户缓冲区 (byte[] buf)写入 socket 缓冲区 ,cpu 会参与拷贝
接下来要向网卡写数据,这项能力 java 又不具备,因此又得从用户态 切换至内核态 ,调用操作系统的写能力,使用 DMA 将 socket 缓冲区 的数据写入网卡,不会使用 cpu
可以看到中间环节较多,java 的 IO 实际不是物理设备级别的读写,而是缓存的复制,底层的真正读写是操作系统来完成的
用户态与内核态的切换发生了 3 次,这个操作比较重量级 数据拷贝了共 4 次 NIO 优化 通过 DirectByteBuf
ByteBuffer.allocate(10) HeapByteBuffer 使用的还是 java 内存 ByteBuffer.allocateDirect(10) DirectByteBuffer 使用的是操作系统内存 大部分步骤与优化前相同,不再赘述。唯有一点:java 可以使用 DirectByteBuf 将堆外内存映射到 jvm 内存中来直接访问使用
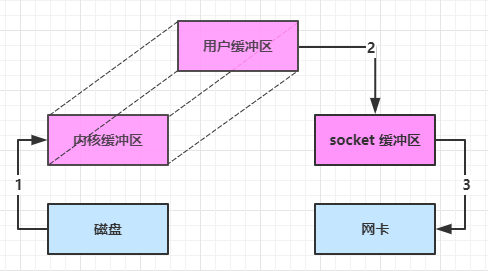
这块内存不受 jvm 垃圾回收的影响,因此内存地址固定,有助于 IO 读写 java 中的 DirectByteBuf 对象仅维护了此内存的虚引用,内存回收分成两步DirectByteBuf 对象被垃圾回收,将虚引用加入引用队列 通过专门线程访问引用队列,根据虚引用释放堆外内存 减少了一次数据拷贝,用户态与内核态的切换次数没有减少 进一步优化(底层采用了 linux 2.1 后提供的 sendFile 方法),java 中对应着两个 channel 调用 transferTo/transferFrom 方法拷贝数据
java 调用 transferTo 方法后,要从 java 程序的用户态 切换至内核态 ,使用 DMA将数据读入内核缓冲区 ,不会使用 cpu 数据从内核缓冲区 传输到 socket 缓冲区 ,cpu 会参与拷贝 最后使用 DMA 将 socket 缓冲区 的数据写入网卡,不会使用 cpu 可以看到
只发生了一次用户态与内核态的切换 数据拷贝了 3 次 进一步优化(linux 2.4)
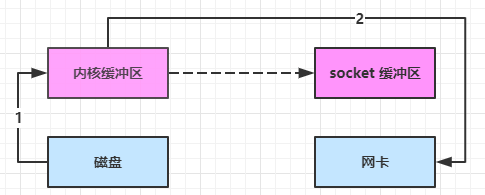
java 调用 transferTo 方法后,要从 java 程序的用户态 切换至内核态 ,使用 DMA将数据读入内核缓冲区 ,不会使用 cpu 只会将一些 offset 和 length 信息拷入 socket 缓冲区 ,几乎无消耗 使用 DMA 将 内核缓冲区 的数据写入网卡,不会使用 cpu 整个过程仅只发生了一次用户态与内核态的切换,数据拷贝了 2 次。所谓的【零拷贝】,并不是真正无拷贝,而是在不会拷贝重复数据到 jvm 内存中,零拷贝的优点有
更少的用户态与内核态的切换 不利用 cpu 计算,减少 cpu 缓存伪共享 零拷贝适合小文件传输 5.3 AIO AIO 用来解决数据复制阶段的阻塞问题
同步意味着,在进行读写操作时,线程需要等待结果,还是相当于闲置 异步意味着,在进行读写操作时,线程不必等待结果,而是将来由操作系统来通过回调方式由另外的线程来获得结果 异步模型需要底层操作系统(Kernel)提供支持
Windows 系统通过 IOCP 实现了真正的异步 IO Linux 系统异步 IO 在 2.6 版本引入,但其底层实现还是用多路复用模拟了异步 IO,性能没有优势 文件 AIO 先来看看 AsynchronousFileChannel
1 2 3 4 5 6 7 8 9 10 11 12 13 14 15 16 17 18 19 20 21 22 23 24 25 26 27 28 29 30 @Slf4j public class AioDemo1 public static void main (String[] args) throws IOException try { AsynchronousFileChannel s = AsynchronousFileChannel.open( Paths.get("1.txt" ), StandardOpenOption.READ); ByteBuffer buffer = ByteBuffer.allocate(2 ); log.debug("begin..." ); s.read(buffer, 0 , null , new CompletionHandler<Integer, ByteBuffer>() { @Override public void completed (Integer result, ByteBuffer attachment) log.debug("read completed...{}" , result); buffer.flip(); debug(buffer); } @Override public void failed (Throwable exc, ByteBuffer attachment) log.debug("read failed..." ); } }); } catch (IOException e) { e.printStackTrace(); } log.debug("do other things..." ); System.in.read(); } }
输出
1 2 3 4 5 6 7 8 13:44:56 [DEBUG] [main] c.i.aio.AioDemo1 - begin... 13:44:56 [DEBUG] [main] c.i.aio.AioDemo1 - do other things... 13:44:56 [DEBUG] [Thread-5] c.i.aio.AioDemo1 - read completed...2 +-------------------------------------------------+ | 0 1 2 3 4 5 6 7 8 9 a b c d e f | +--------+-------------------------------------------------+----------------+ |00000000| 61 0d |a. | +--------+-------------------------------------------------+----------------+
可以看到
响应文件读取成功的是另一个线程 Thread-5 主线程并没有 IO 操作阻塞 💡 守护线程 默认文件 AIO 使用的线程都是守护线程,所以最后要执行 System.in.read() 以避免守护线程意外结束
网络 AIO 1 2 3 4 5 6 7 8 9 10 11 12 13 14 15 16 17 18 19 20 21 22 23 24 25 26 27 28 29 30 31 32 33 34 35 36 37 38 39 40 41 42 43 44 45 46 47 48 49 50 51 52 53 54 55 56 57 58 59 60 61 62 63 64 65 66 67 68 69 70 71 72 73 74 75 76 77 78 79 80 81 82 83 84 85 86 87 88 89 90 91 92 93 94 95 96 97 98 99 100 public class AioServer public static void main (String[] args) throws IOException AsynchronousServerSocketChannel ssc = AsynchronousServerSocketChannel.open(); ssc.bind(new InetSocketAddress(8080 )); ssc.accept(null , new AcceptHandler(ssc)); System.in.read(); } private static void closeChannel (AsynchronousSocketChannel sc) try { System.out.printf("[%s] %s close\n" , Thread.currentThread().getName(), sc.getRemoteAddress()); sc.close(); } catch (IOException e) { e.printStackTrace(); } } private static class ReadHandler implements CompletionHandler <Integer , ByteBuffer > private final AsynchronousSocketChannel sc; public ReadHandler (AsynchronousSocketChannel sc) this .sc = sc; } @Override public void completed (Integer result, ByteBuffer attachment) try { if (result == -1 ) { closeChannel(sc); return ; } System.out.printf("[%s] %s read\n" , Thread.currentThread().getName(), sc.getRemoteAddress()); attachment.flip(); System.out.println(Charset.defaultCharset().decode(attachment)); attachment.clear(); sc.read(attachment, attachment, this ); } catch (IOException e) { e.printStackTrace(); } } @Override public void failed (Throwable exc, ByteBuffer attachment) closeChannel(sc); exc.printStackTrace(); } } private static class WriteHandler implements CompletionHandler <Integer , ByteBuffer > private final AsynchronousSocketChannel sc; private WriteHandler (AsynchronousSocketChannel sc) this .sc = sc; } @Override public void completed (Integer result, ByteBuffer attachment) if (attachment.hasRemaining()) { sc.write(attachment); } } @Override public void failed (Throwable exc, ByteBuffer attachment) exc.printStackTrace(); closeChannel(sc); } } private static class AcceptHandler implements CompletionHandler <AsynchronousSocketChannel , Object > private final AsynchronousServerSocketChannel ssc; public AcceptHandler (AsynchronousServerSocketChannel ssc) this .ssc = ssc; } @Override public void completed (AsynchronousSocketChannel sc, Object attachment) try { System.out.printf("[%s] %s connected\n" , Thread.currentThread().getName(), sc.getRemoteAddress()); } catch (IOException e) { e.printStackTrace(); } ByteBuffer buffer = ByteBuffer.allocate(16 ); sc.read(buffer, buffer, new ReadHandler(sc)); sc.write(Charset.defaultCharset().encode("server hello!" ), ByteBuffer.allocate(16 ), new WriteHandler(sc)); ssc.accept(null , this ); } @Override public void failed (Throwable exc, Object attachment) exc.printStackTrace(); } } }